Tags: TryHackMe hacking knowledge-base completed-work Learning network-security
Links:
Nmap - Guide
It is worth noting that it is best to run Nmap with sudo privileges so that we can make use of all its features. Running Nmap with local user privileges will still work; however, you should expect many features to be unavailable. You get a minimal portion of Nmap’s power when running it as a local user. For instance, Nmap would automatically use SYN scan (-sS) if you are running it with sudo privileges and will default to connect scan (-sT) if run as a local user. The reason is that crafting certain packets, such as sending a TCP SYN packet, requires root privileges.
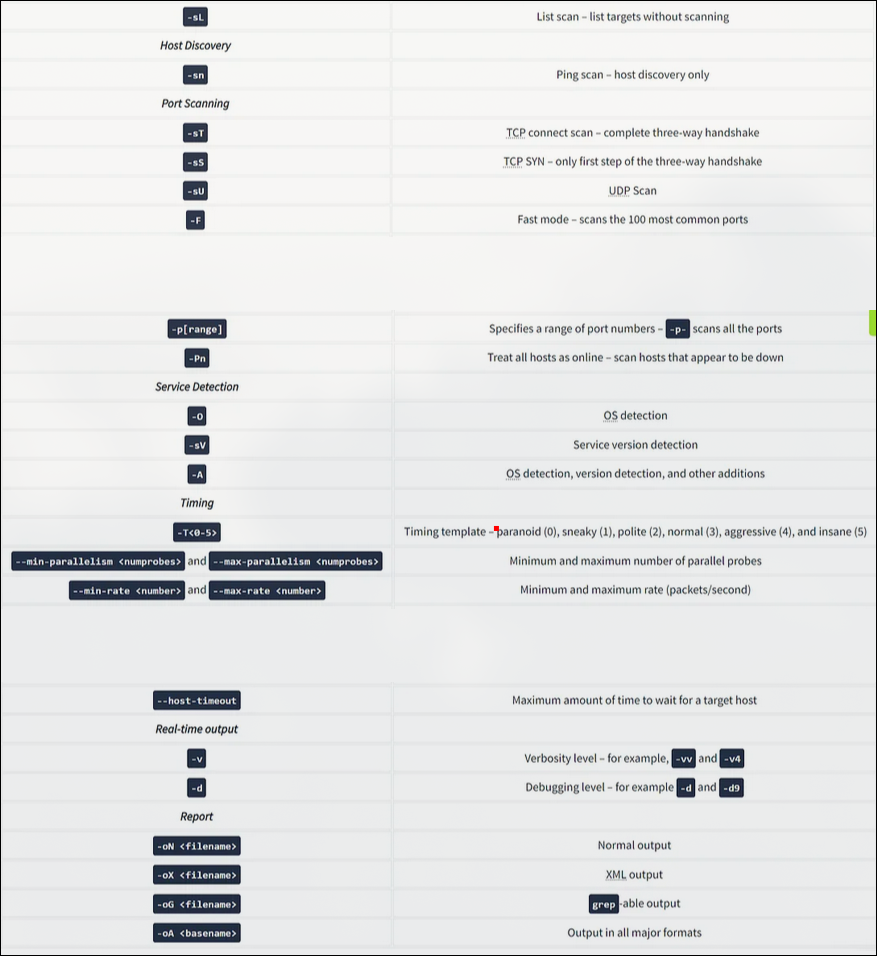 Nmap is a very rich tool, and we only covered the most common and essential features in this room. In the Network Security module, four rooms are dedicated exclusively to Nmap. The table below lists most of the options we explained in this room to help you review and remember them.
| Option | Explanation |
|---|---|
-sL | List scan – list targets without scanning |
| Host Discovery | |
-sn | Ping scan – host discovery only |
| Port Scanning | |
-sT | TCP connect scan – complete three-way handshake |
-sS | TCP SYN – only first step of the three-way handshake |
-sU | UDP Scan |
-F | Fast mode – scans the 100 most common ports |
-p[range] | Specifies a range of port numbers – -p- scans all the ports |
-Pn | Treat all hosts as online – scan hosts that appear to be down |
| Service Detection | |
-O | OS detection |
-sV | Service version detection |
-A | OS detection, version detection, and other additions |
| Timing | |
-T<0-5> | Timing template – paranoid (0), sneaky (1), polite (2), normal (3), aggressive (4), and insane (5) |
--min-parallelism <numprobes> and --max-parallelism <numprobes> | Minimum and maximum number of parallel probes |
--min-rate <number> and --max-rate <number> | Minimum and maximum rate (packets/second) |
--host-timeout | Maximum amount of time to wait for a target host |
| Real-time output | |
-v | Verbosity level – for example, -vv and -v4 |
-d | Debugging level – for example -d and -d9 |
| Report | |
-oN <filename> | Normal output |
-oX <filename> | XML output |
-oG <filename> | grep-able output |
-oA <basename> | Output in all major formats |
Before we start, we should mention that Nmap uses multiple ways to specify its targets:
- IP range using
-: If you want to scan all the IP addresses from 192.168.0.1 to 192.168.0.10, you can write192.168.0.1-10 - IP subnet using
/: If you want to scan a subnet, you can express it as192.168.0.1/24, and this would be equivalent to192.168.0.0-255 - Hostname: You can also specify your target by hostname, for example,
example.thm
Let’s say you want to discover the online hosts on a network. Nmap offers the -sn option, i.e., ping scan. However, don’t expect this to be limited like ping. Let’s see this in action.
Before we get started, we should note that throughout this room, we are either running nmap as root or using sudo because we don’t want to restrict Nmap’s abilities with our account privileges. Running Nmap as a local (non-root) user would limit us to fundamental types of scans such as ICMP echo and TCP connect scans; we will revisit this at the end of this room.
Scanning a “Local” Network
In this context, we use the term “local” to refer to the network we are directly connected to, such as an Ethernet or WiFi network. In the first demonstration, we will scan the WiFi network to which we are connected. Our IP address is 192.168.66.89, and we are scanning the 192.168.66.0/24 network. The nmap -sn 192.168.66.0/24 command and its output are shown in the terminal below.
AttackBox Terminal
`root@tryhackme:~# nmap -sn 192.168.66.0/24 Starting Nmap 7.92 ( https://nmap.org ) at 2024-08-07 13:49 EEST Nmap scan report for XiaoQiang (192.168.66.1) Host is up (0.0069s latency). MAC Address: 44:DF:65:D8:FE:6C (Unknown) Nmap scan report for S190023240007 (192.168.66.88) Host is up (0.090s latency). MAC Address: 7C:DF:A1:D3:8C:5C (Espressif) Nmap scan report for wlan0 (192.168.66.97) Host is up (0.20s latency). MAC Address: 10:D5:61:E2:18:E6 (Tuya Smart) Nmap scan report for 192.168.66.179 Host is up (0.10s latency). MAC Address: E4:AA:EC:8F:88:C9 (Tianjin Hualai Technology) [...] Nmap done: 256 IP addresses (7 hosts up) scanned in 2.64 seconds`
Because we are scanning the local network, where we are connected via Ethernet or WiFi, we can look up the MAC addresses of the devices. Consequently, we can figure out the network card vendors, which is beneficial information as it can help us guess the type of target device(s).
When scanning a directly connected network, Nmap starts by sending ARP requests. When a device responds to the ARP request, Nmap labels it with “Host is up”.
Scanning a “Remote” Network
Consider the case of a “remote” network. In this context, “remote” means that at least one router separates our system from this network. As a result, all our traffic to the target systems must go through one or more routers. Unlike scanning a local network, we cannot send an ARP request to the target.
Our system has the IP address 192.168.66.89 and belongs to the 192.168.66.0/24 network. In the terminal below we scan the target network 192.168.11.0/24 where there are two or more routers (hops) separate our local system from the target hosts.
AttackBox Terminal
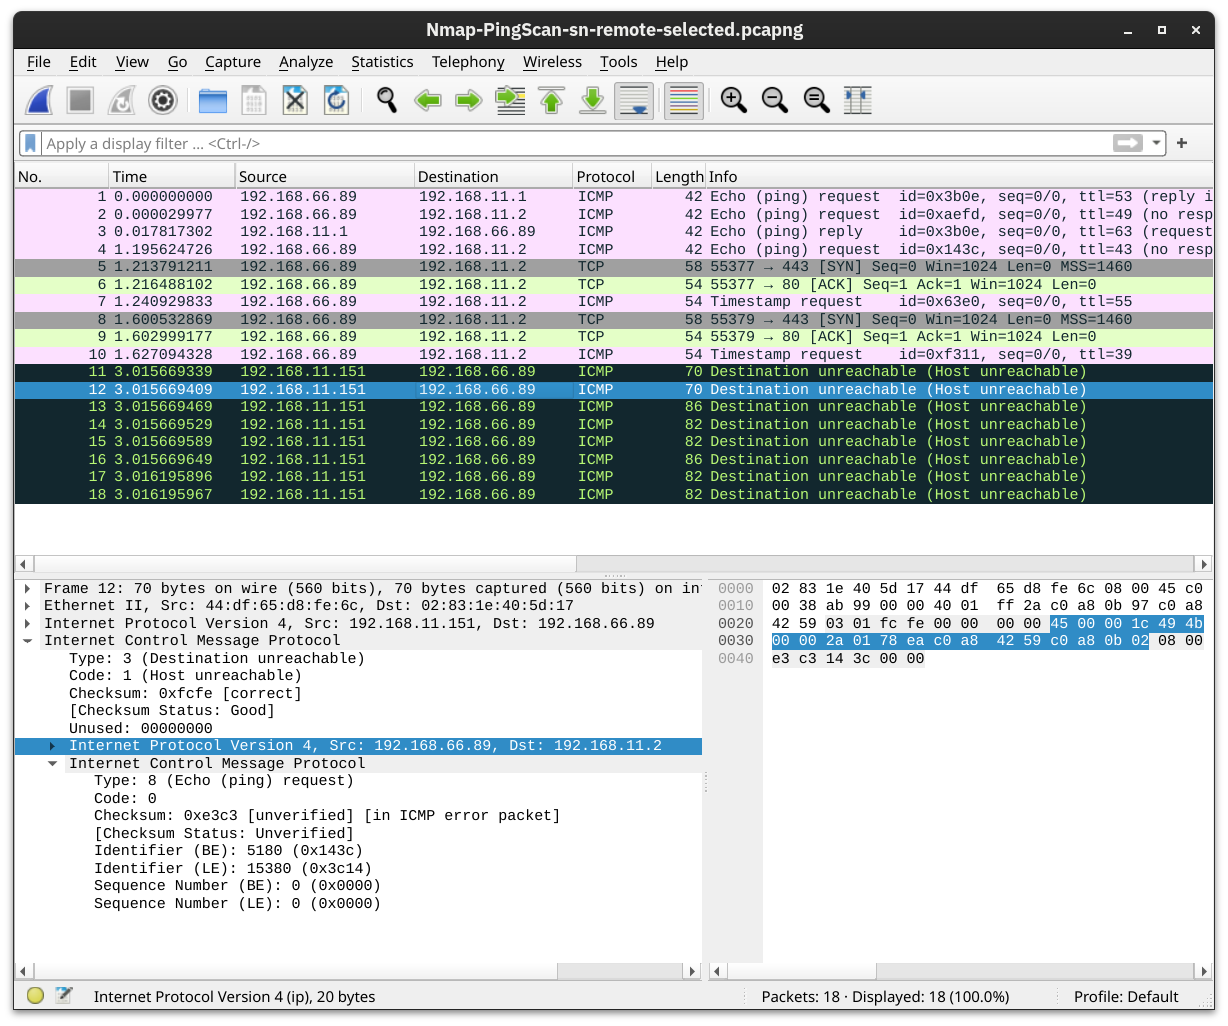
root@tryhackme:~# nmap -sn 192.168.11.0/24 Starting Nmap 7.92 ( https://nmap.org ) at 2024-08-07 14:05 EEST Nmap scan report for 192.168.11.1 Host is up (0.018s latency). Nmap scan report for 192.168.11.151 Host is up (0.0013s latency). Nmap scan report for 192.168.11.152 Host is up (0.13s latency). Nmap scan report for 192.168.11.154 Host is up (0.22s latency). Nmap scan report for 192.168.11.155 Host is up (2.3s latency). Nmap done: 256 IP addresses (5 hosts up) scanned in 10.67 seconds
The Nmap output shows that five hosts are up. But how did Nmap discover this? To learn more, let’s see some sample traffic generated by Nmap. In the screenshot below, we can see the responses from two hosts:
192.168.11.1is live and responded to the ICMP echo (ping) request.192.168.11.2seems down. Nmap sent two ICMP echo (ping) requests, two ICMP timestamp requests, two TCP packets to port 443 with the SYN flag set, and two TCP packets to port 80 with the ACK flag set. The target didn’t respond to any. We observe several ICMP destination unreachable packets from the192.168.11.151router.
nmap -O -sS 192.168.1.1/24
192.168.1.1/24 Means that you are scanning the network 192.168.1.0 with a netmask of 255.255.255.0. That is what the /24 at the end means, it is also called CIDR notation. That means that only the IPs from 192.168.1.1 thru 192.168.1.254 are scanned. Nothing outside of your network will be scanned at all.
I use the Online IP Subnet Calculator all the time to see what IP addresses belong to what range. Look at the Mask Bits and that is what the /24 at the end means.
http://www.subnet-calculator.com/
Site with CIDR notation: http://www.subnet-calculator.com/cidr.php
It is worth noting that we can have more control over how Nmap discovers live hosts such as -PS[portlist], -PA[portlist], -PU[portlist] for TCP SYN, TCP ACK, and UDP discovery via the given ports. However, this is beyond the scope of this room.
As a final point, Nmap offers a list scan with the option -sL. This scan only lists the targets to scan without actually scanning them. For example, nmap -sL 192.168.0.1/24 will list the 256 targets that will be scanned. This option helps confirm the targets before running the actual scan.
As we mentioned earlier, -sn aims to discover live hosts without attempting to discover the services running on them. This scan might be helpful if you want to discover the devices on a network without causing much noise. However, this won’t tell us which services are running. If we want to learn more about the network services running on the live hosts, we need a more “noisy” type of scan.
Nmap scans the most common 1,000 ports by default. However, this might not be what you are looking for. Therefore, Nmap offers you a few more options.
-Fis for Fast mode, which scans the 100 most common ports (instead of the default 1000).-p[range]allows you to specify a range of ports to scan. For example,-p10-1024scans from port 10 to port 1024, while-p-25will scan all the ports between 1 and 25. Note that-p-scans all the ports and is equivalent to-p1-65535and is the best option if you want to be as thorough as possible.
Summary
| Option | Explanation |
|---|---|
-sT | TCP connect scan – complete three-way handshake |
-sS | TCP SYN – only first step of the three-way handshake |
-sU | UDP scan |
-F | Fast mode – scans the 100 most common ports |
-p[range] | Specifies a range of port numbers – -p- scans all the ports |
| Option | Explanation |
|---|---|
-O | OS detection |
-sV | Service and version detection |
-A | OS detection, version detection, and other additions |
-Pn | Scan hosts that appear to be down |
OS Detection
You can enable OS detection by adding the -O option. As the name implies, the OS detection option triggers Nmap to rely on various indicators to make an educated guess about the target OS. In this case, it is detecting the target has Linux 4.x or 5.x running. That’s actually true. However, there is no perfectly accurate OS detector. The statement that it is between 4.15 and 5.8 is very close as the target host’s OS is 5.15.
AttackBox Terminal
`root@tryhackme:~# nmap -sS -O 192.168.124.211 Starting Nmap 7.94SVN ( https://nmap.org ) at 2024-08-13 13:37 EEST Nmap scan report for ubuntu22lts-vm (192.168.124.211) Host is up (0.00043s latency). Not shown: 999 closed tcp ports (reset) PORT STATE SERVICE 22/tcp open ssh MAC Address: 52:54:00:54:FA:4E (QEMU virtual NIC) Device type: general purpose Running: Linux 4.X|5.X OS CPE: cpe:/o:linux:linux_kernel:4 cpe:/o:linux:linux_kernel:5 OS details: Linux 4.15 - 5.8 Network Distance: 1 hop OS detection performed. Please report any incorrect results at https://nmap.org/submit/ . Nmap done: 1 IP address (1 host up) scanned in 1.44 seconds`
Service and Version Detection
You discovered several open ports and want to know what services are listening on them. -sV enables version detection. This is very convenient for gathering more information about your target with fewer keystrokes. The terminal output below shows an additional column called “VERSION”, indicating the detected SSH server version.
AttackBox Terminal
`root@tryhackme:~# nmap -sS -sV 192.168.124.211 Starting Nmap 7.94SVN ( https://nmap.org ) at 2024-08-13 13:33 EEST Nmap scan report for ubuntu22lts-vm (192.168.124.211) Host is up (0.000046s latency). Not shown: 999 closed tcp ports (reset) PORT STATE SERVICE VERSION 22/tcp open ssh OpenSSH 8.9p1 Ubuntu 3ubuntu0.10 (Ubuntu Linux; protocol 2.0) MAC Address: 52:54:00:54:FA:4E (QEMU virtual NIC) Service Info: OS: Linux; CPE: cpe:/o:linux:linux_kernel Service detection performed. Please report any incorrect results at https://nmap.org/submit/ . Nmap done: 1 IP address (1 host up) scanned in 0.25`
What if you can have both -O, -sV and some more in one option? That would be -A. This option enables OS detection, version scanning, and traceroute, among other things.
Forcing the Scan
When we run our port scan, such as using -sS, there is a possibility that the target host does not reply during the host discovery phase (e.g. a host doesn’t reply to ICMP requests). Consequently, Nmap will mark this host as down and won’t launch a port scan against it. We can ask Nmap to treat all hosts as online and port scan every host, including those that didn’t respond during the host discovery phase. This choice can be triggered by adding the -Pn option.

Nmap provides various options to control the scan speed and timing.
Running your scan at its normal speed might trigger an IDS or other security solutions. It is reasonable to control how fast a scan should go. Nmap gives you six timing templates, and the names say it all: paranoid (0), sneaky (1), polite (2), normal (3), aggressive (4), and insane (5). You can pick the timing template by its name or number. For example, you can add -T0 (or -T 0) or -T paranoid to opt for the slowest timing.
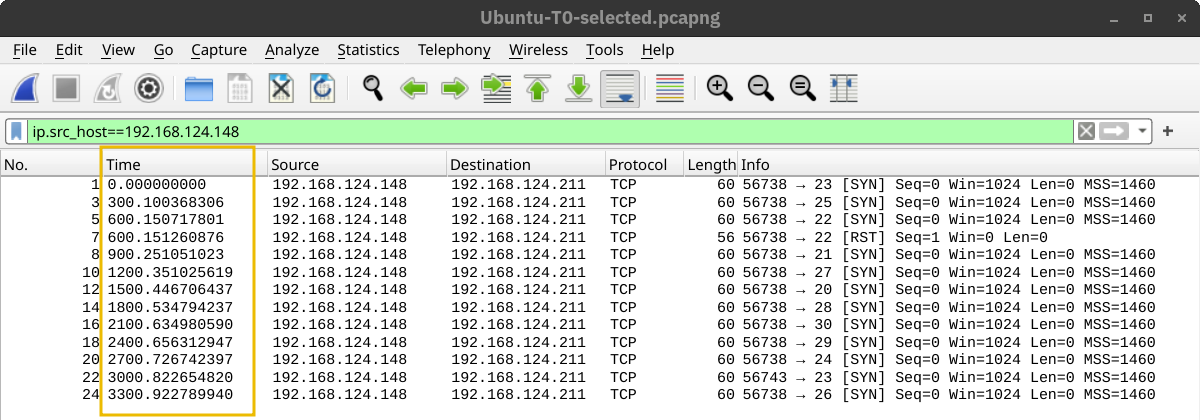
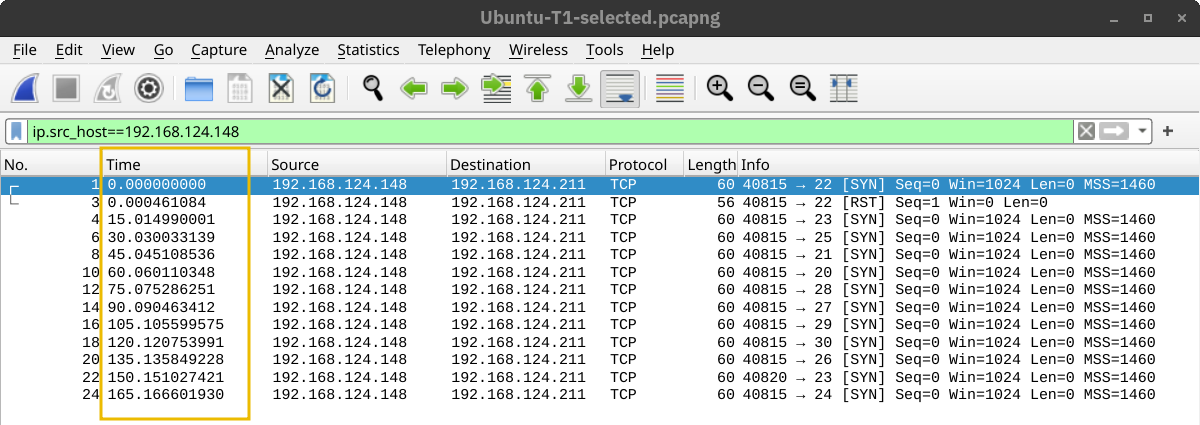
In the Nmap scans below, we launch a SYN scan targeting the 100 most common TCP ports, nmap -sS 10.10.200.100 -F. We repeated the scan with different timings: T0, T1, T2, T3, and T4. In our lab setup, Nmap took different amounts of time to scan the 100 ports. The table below should give you an idea, but you will get different results depending on the network setup and target system.
| Timing | Total Duration |
|---|---|
| T0 (paranoid) | 9.8 hours |
| T1 (sneaky) | 27.53 minutes |
| T2 (polite) | 40.56 seconds |
| T3 (normal) | 0.15 seconds |
| T4 (aggressive) | 0.13 seconds |
In the following screenshots, we can see the time when Nmap sent the different packets. In this screenshot below, with the scan timing being T0, we can see that Nmap waited 5 minutes before moving to the next port.
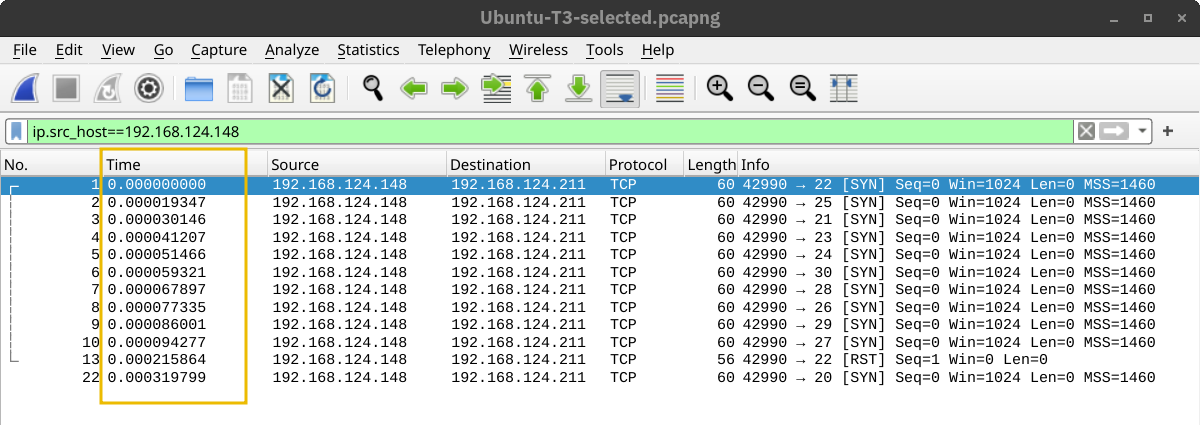
In the screenshot below, Nmap waited 15 seconds between every two ports when we set the timing to T1.
Then, the waiting dropped to 0.4 seconds for T2 as shown below.
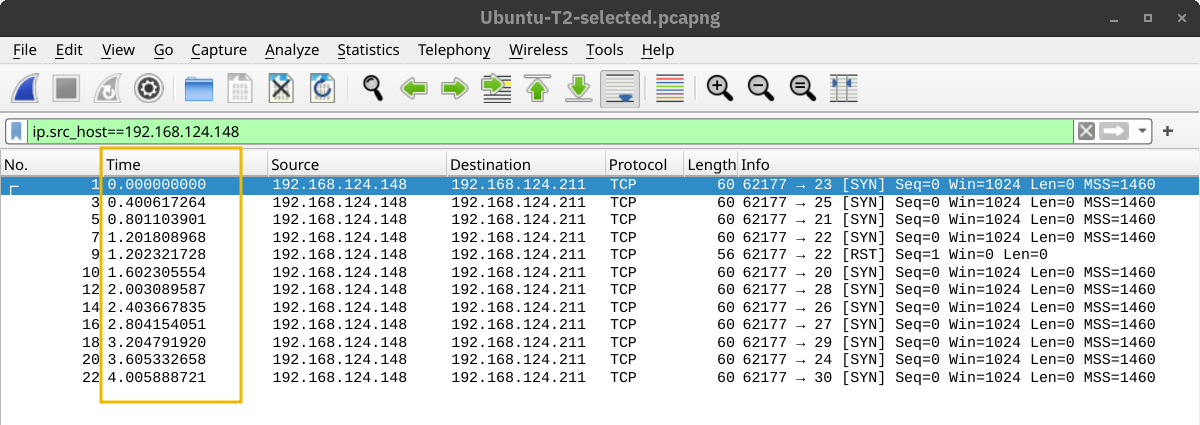
Finally, in the default case, T3, Nmap appeared to be running as fast as it could, as shown below. It is worth repeating that this would look different on a different lab setup. However, in this particular case, Nmap considered the connection to the target to be fast and reliable, as no packet loss was incurred.
A second helpful option is the number of parallel service probes. The number of parallel probes can be controlled with --min-parallelism <numprobes> and --max-parallelism <numprobes>. These options can be used to set a minimum and maximum on the number of TCP and UDP port probes active simultaneously for a host group. By default, nmap will automatically control the number of parallel probes. If the network is performing poorly, i.e., dropping packets, the number of parallel probes might fall to one; furthermore, if the network performs flawlessly, the number of parallel probes can reach several hundred.
A similar helpful option is the --min-rate <number> and --max-rate <number>. As the names indicate, they can control the minimum and maximum rates at which nmap sends packets. The rate is provided as the number of packets per second. It is worth mentioning that the specified rate applies to the whole scan and not to a single host.
The last option we will cover in this task is --host-timeout <time>. This option specifies the maximum time you are willing to wait, and it is suitable for slow hosts or hosts with slow network connections.
| Option | Explanation |
|---|---|
-T<0-5> | Timing template – paranoid (0), sneaky (1), polite (2), normal (3), aggressive (4), and insane (5) |
--min-parallelism <numprobes> and --max-parallelism <numprobes> | Minimum and maximum number of parallel probes |
--min-rate <number> and --max-rate <number> | Minimum and maximum rate (packets/second) |
--host-timeout | Maximum amount of time to wait for a target host |